One weak solder joint can kill an entire production run. Poor solder wetting is one of the most common issues in the soldering process, which can lead to weak connections, failed components, and costly rework. In this article, we’ll break down the main causes for poor wetting and share actionable ways to avoid it during PCB soldering.
What Is Solder Wetting?
Solder wetting is the capacity of molten solder to spread over and adhere to the metal part surface (such as PCB pads and component leads), forming a reliable metallurgical bond. To achieve a proper and smooth soldering wetting process, two specific conditions need to be met:
- A clean copper surface without oxidation or contamination.
- An appropriate soldering temperature.
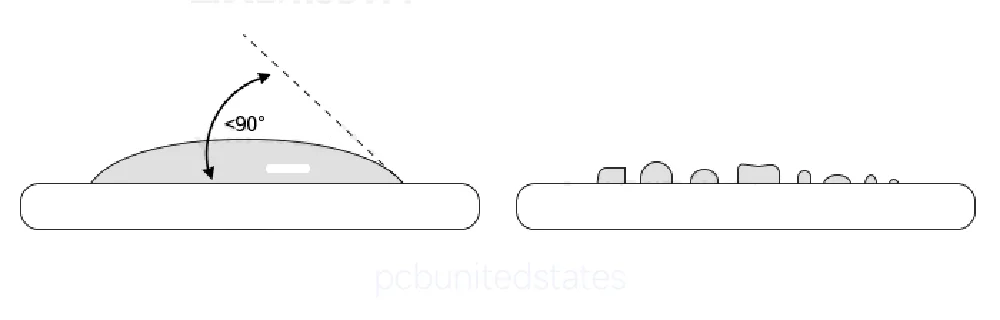
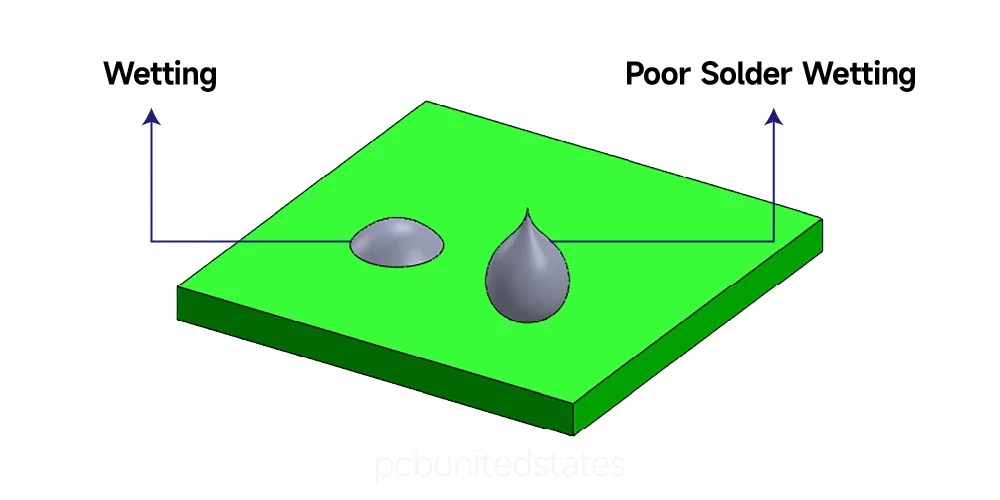
Commonly, solder wetting is judged by the appearance of the solder joint. A well-wetted joint is smooth and shiny, indicating proper solder flow. The wetting angle is also used to evaluate solder wetting performance. It describes the contact angle that develops during the soldering process between molten solder and the substrate (a pad/component lead). Per IPC-A-610 standard, acceptable criteria are:
- Wetting angle < 90°: acceptable.
- Wetting angle > 90°: poor solder wetting, increasing potential defect risks.
Why Does Soldering Wetting Matter?
Proper soldering wetting is essential to achieve reliable connections (both electrical and mechanical) during the PCB soldering process. If the solder wetting is insufficient, the solder may fail to attach the pad or component lead securely. Formed solder joints are dull, porous, and granular, with poor adhesion.
Poor solder wetting can result in certain common soldering defects, which may include cold solder joints, incomplete wetting, and open joints. Over time, these weak solder joints are prone to cracking and degradation under the influence of thermal cycling, vibration, and mechanical stress. They greatly impact the long-term reliability of products.
Top 6 Causes of Poor Solder Wetting or Solder Dewetting
Poor solder wetting can compromise both the mechanical and electrical integrity of solder joints. Identifying the main causes is essential to preventing this issue.
1. Surface Contamination
Grease, oil, or flux residue on the PCB surface can contaminate the pads. This contamination can prevent proper solder-to-copper bonding, resulting in incomplete wetting.
2. Copper Pad Surface Oxidation
An oxide layer is easily formed when copper pads react with airborne oxygen. This oxide layer affects the wettability of the solder and is one of the main causes of solder dewetting. When using lead-free solder (such as Sn-Ag-Cu), higher soldering temperatures are required, and this increased temperature accelerates the oxidation rate.
3. Incorrect Soldering Temperature Range
- Excessively low soldering temperature – Insufficient solder fluidity, inadequate component contact.
- Excessively high soldering temperature – Accelerated solder vaporization, impaired wetting.
4. Poor PCB Design
- Copper pad size and shape – The copper pad size is too small, or its shape is unsuitable, preventing the solder from spreading properly.
- Incorrectly definedsolder mask – An inaccurate solder mask can hinder solder flow to the pads or guide the solder to unintended locations, resulting in incomplete solder joints.
- Unoptimized stencil design- The stencil opening determines the amount and location of solder paste deposited. Insufficient solder paste can lead to partial poor solder wetting.
5. Poor Solderability
- Copper pad plating issues- Improper copper pad plating or coating. Uneven or insufficient plating thickness. Damage during PCB manufacturing (cutting, drilling, etching).
- Solder paste degradation- Incorrect storage or prolonged storage of solder paste can lead to a decrease in solderability.
6. Improper Soldering Technique and Tool
- Excessive contact pressure – It may damage the metallization of the pad or component termination. Simultaneously, it squeezes out the flux that has not yet been fully activated.
- Prolonged tip dwell time – When the soldering tip is in contact with the component lead or solder pad for an extended period, the local temperature will continuously rise, causing the flux to burn or evaporate prematurely.
- Oxidised soldering cartridge – Oxidation on the soldering cartridge will form a barrier to prevent solder from flowing smoothly and reduce wettability. This often occurs when using an untinned tip or working at extremely high temperatures.
5 Ways of Preventing Poor Solder Wetting During the Soldering Process
Poor wetting is usually the beginning of weak solder joints. Here we break down 5 practical ways to prevent solder.
1. Optimizing PCB Design
To prevent inefficient solder wetting, it begins with good PCB design. Proper pad design helps the solder wet the pads thoroughly and bond properly. You should not use pads that are too small with irregular designs that restrict solder flow. Apart from this consideration, it is essential that your solder mask openings accurately expose the pads. Good solder mask openings direct the solder flow towards the pads safely and avoid bridging and inefficient wetting.
2. Ensuring PCB Cleanliness Before Soldering
Use PCB cleaning agents/solvent wipes to remove any contamination completely from the surface of the PCB before proceeding with soldering. This is an effective method of cleaning grease/dirt, which can hamper solder wetting.
3. Choosing the Right and High-Quality Flux
Flux aids in the flow of solder and removes oxidation. A good quality flux, compatible with the solder and pads, must be chosen. The solder would smoothly wet the pads and leads if appropriate flux and amount are applied. However, one must not apply an excessive amount of flux because it leaves residue on the pads. Nonetheless, an insufficient amount of flux would hamper the process of wetting.
4. Selecting a Higher-Activity Solder Paste
Using a solder paste that has higher levels of flux activity can help wet slightly oxidized or contaminated pads more effectively. The reason is that highly active flux could eliminate the existence of oxides at the surface of the pads. It is most applicable when it comes to difficult-to-solder surfaces like immersion silver, immersion tin, and OSP.
5. Using the Correct Techniques
Control the contact time between the soldering iron tip and the component pins or solder pads. Heat the pads and leads evenly to the appropriate soldering temperature, then apply solder to allow it to fully wet the surfaces. Avoid overheating and moving the joint during cooling, allowing the solder to solidify naturally.
Last Words
Understanding the causes of poor solder wetting and taking appropriate measures can help prevent solder dewetting. If you encounter poor solder wetting problems, there’s no need to worry too much. You can let the solder joint cool, clean off any remaining flux, reheat it, and perform a second soldering process to repair the joint. MOKOPCB is a trusted PCB manufacturer in the industry, providing professional printed circuit board solutions. Please feel free to contact us with any needs or questions.
